This quick skillet meal delivers a sweet and spicy glaze over tender chicken in under 20 minutes. It is a practical alternative to takeout that is easy to prepare on busy weeknights.
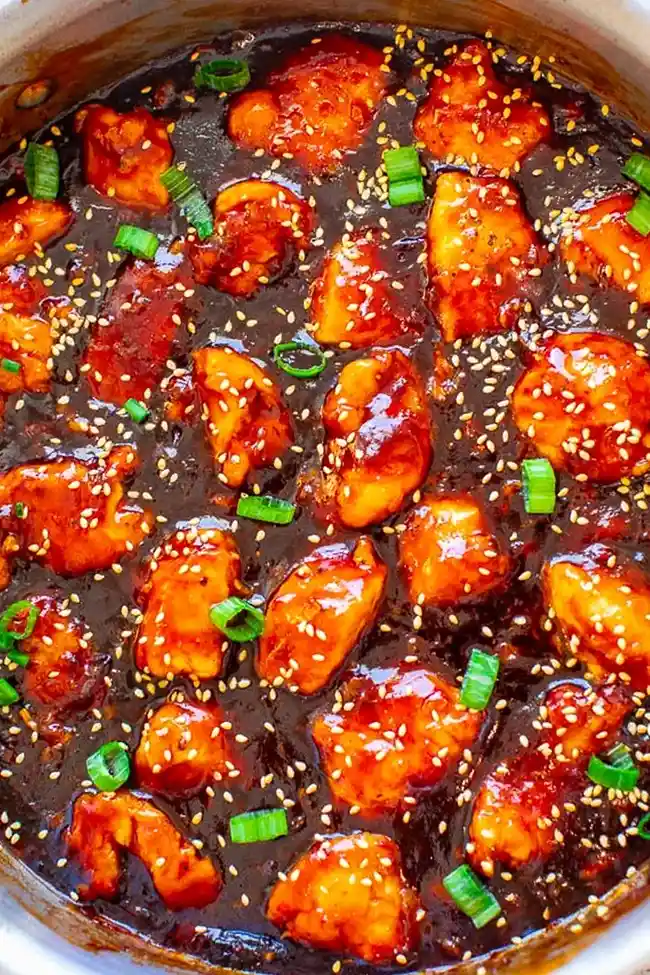
List of ingredients
- 1/2 to 2/3 cup honey – provides sweetness and a glossy finish.
- 1/2 cup ketchup – adds tang and a rich red color.
- 1/4 cup apple cider vinegar – can be substituted with rice vinegar or regular white vinegar.
- 1/4 cup soy sauce – provides a savory, salty base.
- 1/4 cup brown sugar, packed – adds a deep, caramelized sweetness.
- 2 tablespoons granulated sugar – helps the glaze set and thicken.
- 1 to 4 tablespoons chili garlic sauce – adjust based on your heat preference.
- 1 large egg, lightly beaten – used for dredging the chicken.
- 1/2 cup all-purpose flour – helps the breading adhere to the meat.
- 1/3 cup corn starch – creates a crisp exterior when seared.
- 1.25 to 1.50 pound boneless skinless chicken breast – cut into bite-sized pieces.
- 3 to 4 tablespoons olive oil – for frying the chicken pieces.
- 1 1/2 tablespoons cornstarch mixed with 2 tablespoons cold water – creates the thickening slurry.
- Green onions, sliced thin – optional for garnish.
- Sesame seeds – optional for garnish.
step-by-step instructions
- Prepare the Glaze: In a medium bowl, whisk together the honey, ketchup, vinegar, soy sauce, brown sugar, granulated sugar, and chili garlic sauce. Set this mixture aside until the chicken is ready.
- Setup Dredging Station: Prepare three separate shallow bowls: one with the lightly beaten egg, one with all-purpose flour, and one with 1/3 cup cornstarch.
- Coat the Chicken: Dip the chicken pieces into the egg bowl first. Transfer them to the flour bowl for a light coating, then finally toss them in the cornstarch bowl until well-covered.
- Sear the Meat: Heat the olive oil in a large skillet over medium to medium-high heat. Add the chicken and cook for approximately 7 minutes, or until the pieces are seared, lightly browned, and cooked through.
- Combine and Simmer: Reduce the heat to medium and pour the prepared sauce into the skillet. Stir well to ensure all the chicken is evenly coated.
- Thicken the Sauce: In a small bowl, mix the 1 1/2 tablespoons of cornstarch with 2 tablespoons of cold water to make a slurry. Pour the slurry into the skillet and stir continuously for about 5 minutes as the sauce boils gently and thickens.
- Final Touch: Once the sauce is sticky and clings to the chicken, remove from heat. Garnish with sliced green onions and sesame seeds before serving immediately.
Expert Tips for Sauce Consistency
Maintain Medium Heat
Avoid using high heat once the sauce is added to the pan. Because the glaze contains high amounts of sugar and honey, it can burn quickly and turn bitter. Keep the temperature at medium to allow the sauce to reduce slowly.
Stir Constantly During Reduction
Use a whisk or a spatula to stir the sauce nearly continuously for the final five minutes. This prevents the cornstarch from settling at the bottom and scorching. It also ensures the glaze is smooth and evenly distributed across the meat.
Proper Slurry Integration
Always mix the cornstarch with cold water before adding it to the hot pan. Adding dry cornstarch directly into the sauce will create lumps that are impossible to stir out. The cold water suspension ensures a perfectly glossy and smooth finish.
Account for Cooling Thickening
Remember that sauces thickened with cornstarch continue to tighten as they cool. If the sauce looks slightly thinner than desired while boiling, it will likely reach the perfect consistency by the time it hits the plate. Avoid over-reducing to prevent the sauce from becoming too gummy.
Ingredient Substitutions and Swaps
Alternative Sweeteners
If you do not have honey, maple syrup is an excellent substitute that provides a similar viscosity. Agave nectar also works well, though it has a more neutral flavor. Ensure you maintain the same measurement to preserve the balance of the glaze.
Vinegar Variations
Rice vinegar is the most authentic choice for this flavor profile as it is milder than apple cider vinegar. If neither is available, white distilled vinegar can be used, but you may want to add an extra teaspoon of sugar to balance the sharper acidity.
Using Chicken Thighs
Boneless skinless chicken thighs can be used instead of breasts for a juicier result. Thighs are more forgiving and less likely to dry out during the searing process. Follow the same dredging and cooking steps for the same result.
Soy Sauce Replacements
For a gluten-free option, substitute the soy sauce with tamari. Coconut aminos are another alternative, offering a slightly sweeter and less salty taste. If using coconut aminos, add a small pinch of salt to maintain the savory depth.
Flavor Variations to Try
Incorporating Fresh Ginger
Add one tablespoon of freshly grated ginger to the sauce mixture for a zesty, aromatic kick. Ginger complements the chili garlic sauce and adds a layer of brightness to the dish. Grate it finely so it blends seamlessly into the glaze.
Adding Minced Garlic
While the chili garlic sauce provides some flavor, adding two cloves of fresh minced garlic to the oil before searing the chicken adds depth. Sauté the garlic for 30 seconds before adding the meat to avoid burning it.
Adding Fresh Vegetables
Toss in steamed broccoli florets or snap peas during the final five minutes of simmering. This turns the meal into a complete one-pan dish. Ensure the vegetables are lightly blanched first so they cook through without overcooking the chicken.
Adjusting the Heat Level
For a milder version, reduce the chili garlic sauce to one tablespoon or omit it entirely. If you prefer more heat, add a teaspoon of red pepper flakes or a dash of Sriracha to the sauce mixture before whisking.
Serving Recommendations
Steamed Rice Pairings
Serve the sticky chicken over a bed of steamed jasmine rice for a traditional experience. The floral aroma of jasmine rice complements the sweet glaze perfectly. Brown rice is a heartier alternative that adds a nutty flavor and more fiber.
Fresh Vegetable Sides
Pair this dish with a side of sautéed bok choy or a crisp cucumber salad. The freshness of raw or lightly cooked greens cuts through the richness of the sticky sauce. A simple sesame-ginger dressing on the vegetables works best.
Noodle Bed Options
Thin rice noodles or udon noodles are great alternatives to rice. Toss the noodles in a small amount of sesame oil and soy sauce before topping them with the chicken. This allows the extra sauce to soak into the noodles.
Storage and Reheating Guide
Refrigeration Method
Store leftover chicken in an airtight container in the refrigerator for up to five days. Ensure the chicken is completely cooled before sealing the lid to prevent excess moisture from building up inside. This keeps the coating from becoming too soggy.
Freezing Instructions
This dish can be frozen for up to four months in a freezer-safe container or vacuum-seal bag. Remove as much air as possible to prevent freezer burn. Label the container with the date to ensure quality.
Best Reheating Techniques
For the best texture, reheat the chicken in a skillet over medium heat with a tablespoon of water or broth. This helps loosen the sauce and restores the glossy appearance. If using a microwave, heat on medium power and stir halfway through.
Common Troubleshooting
Sauce Remaining Too Thin
If the sauce has not thickened after five minutes, mix an additional teaspoon of cornstarch with a teaspoon of cold water. Stir this extra slurry into the boiling sauce and simmer for another minute. Be careful not to overdo it, or the sauce will become a paste.
Sauce Becoming Too Thick
If the glaze becomes too thick or gummy, stir in a tablespoon of water or chicken broth. Heat the mixture on low and stir until the desired consistency is restored. This usually happens if the heat was too high during the reduction phase.
Chicken Coating Falling Off
Ensure the chicken pieces are patted dry with a paper towel before dipping them in the egg. If the meat is too wet, the breading will slide off during the searing process. Press the flour and cornstarch firmly into the meat for better adhesion.
Chicken Overcooking
Avoid overcrowding the skillet, as this lowers the temperature and causes the chicken to steam rather than sear. Cook the chicken in batches if necessary. This ensures each piece gets a crisp, brown crust without overcooking the interior.
Frequently Asked Questions
Can I make sticky chicken in a Crockpot?
No, this specific recipe is not suitable for a slow cooker. The crispiness of the dredged chicken and the reduction of the sauce both require the high, direct heat of a skillet.
Is this recipe spicy?
The spice level depends on the amount of chili garlic sauce used. Three tablespoons provide a noticeable kick, while one tablespoon is mild. You can omit the sauce entirely if you prefer no heat.
Why use cornstarch for dredging?
Cornstarch creates a lighter, crispier crust than flour alone. It also helps the sticky sauce cling to the chicken pieces more effectively, ensuring every bite is well-coated.
Can I use a different oil for frying?
Yes, any neutral oil with a high smoke point will work. Canola oil, vegetable oil, or peanut oil are all excellent substitutes for olive oil in this recipe.
) Print
Homemade Sticky Asian Chicken
- Total Time: 20 minutes
- Yield: 5 servings 1x
- Diet: General
Description
Stop calling for takeout or going to the mall food court and make this AMAZING sticky chicken at home in 15 minutes!! So EASY with the perfect balance of sweet and spicy with plenty of sticky sauce!
Ingredients
- 1/2 to 2/3 cup honey
- 1/2 cup ketchup
- 1/4 cup apple cider vinegar (or regular or rice vinegar)
- 1/4 cup soy sauce
- 1/4 cup brown sugar, packed
- 2 tablespoons granulated sugar
- 1 to 4 tablespoons chili garlic sauce
- 1 large egg, lightly beaten
- 1/2 cup all-purpose flour
- 1/3 cup corn starch, for dredging
- 1.25 to 1.50 pound boneless skinless chicken breast, cut into bite-sized pieces
- 3 to 4 tablespoons olive oil
- 1 1/2 tablespoons cornstarch + 2 tablespoons cold water
- green onions, sliced thin (optional for garnishing)
- sesame seeds (optional for garnishing)
Instructions
- Step: Whisk honey, ketchup, vinegar, soy sauce, brown sugar, granulated sugar, and chili garlic sauce in a medium bowl and set aside.
- Step: Prepare three separate shallow bowls: one with beaten egg, one with flour, and one with 1/3 cup corn starch.
- Step: Coat chicken pieces in egg, then flour, then corn starch.
- Step: Heat olive oil in a large skillet over medium to medium-high heat and cook chicken for about 7 minutes until seared and cooked through.
- Step: Reduce heat to medium and stir in the sauce.
- Step: Mix 1 1/2 tablespoons cornstarch and 2 tablespoons cold water in a small bowl to create a slurry, then add it to the skillet.
- Step: Stir nearly continuously for about 5 minutes until the sauce has thickened.
- Step: Garnish with green onions and sesame seeds.
Notes
This makes a lot of sauce; if you prefer less or do not want extra for rice, halve the sauce ingredients.
- Prep Time: 5 minutes
- Cook Time: 15 minutes
- Category: 30-Minute Meals
- Method: Stir-fry
- Cuisine: Asian
Nutrition
- Serving Size: 1 serving
- Calories: 561 kcal
- Sugar: 49 g
- Sodium: 1240 mg
- Fat: 16 g
- Saturated Fat: 3 g
- Unsaturated Fat: 11 g
- Trans Fat: 0.03 g
- Carbohydrates: 71 g
- Fiber: 1 g
- Protein: 33 g
- Cholesterol: 253 mg