Preserving your own salmon ensures a high-quality pantry staple without the additives found in store-bought versions. This pressure canning method maintains the fish’s natural oils and nutrients for safe long-term storage.
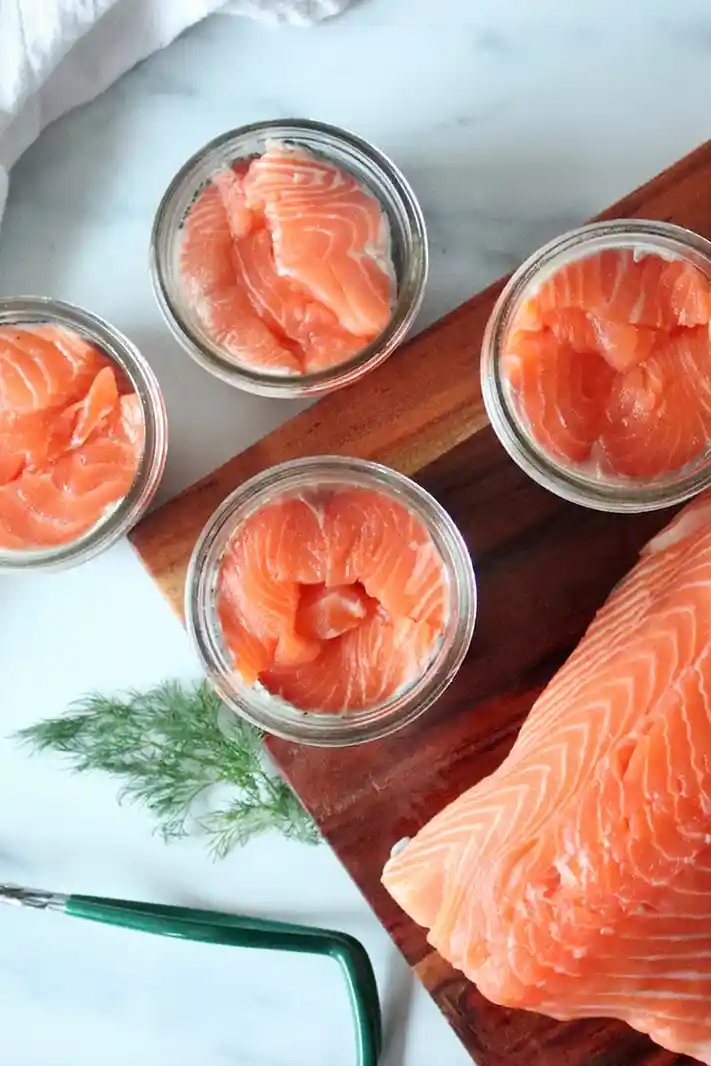
List of ingredients
- 4 lbs Fresh salmon – approximately 1 lb per pint jar.
- 1 tsp Salt – optional, added for flavor.
step-by-step instructions
- Prepare the fish: Start with fresh, cleaned fish, keeping it refrigerated and cold until processing, for no more than two days.
- Clean the salmon: Remove the head, tail, scales, fins, and skin, then wash the fillets thoroughly to remove all blood.
- Cut into portions: Slice the salmon fillets into smaller pieces, approximately 3.5 inches in length, so they fit into pint jars without needing to be compressed.
- Heat the canner: Pour two to three inches of water into your pressure canner and heat the water until it reaches a simmer.
- Prepare jars: Ensure all canning jars are clean and sterilized before filling.
- Fill jars: Place the salmon pieces into the jars, leaving exactly one inch of headspace; do not add water or broth.
- Add salt: If using salt, add 1/2 teaspoon per pint jar or 1/4 teaspoon per half-pint jar.
- Clean rims: Wipe the rim of each jar with a clean, damp cloth to remove any food particles or fatty deposits.
- Seal jars: Place a hot lid on the jar and screw the metal band on until it is fingertip tight, avoiding overtightening.
- Load canner: Place the filled jars on a rack inside the canner, leaving room for steam to flow freely; use a rack between layers if stacking.
- Vent the steam: Close the canner lid and heat until steam escapes from the open vent, then let it vent for 10 minutes.
- Pressurize: Close the petcock or place the pressure regulator on the vent pipe, reaching 11 lbs for dial gauges or 10 lbs for weighted gauges.
- Process: Process the jars for 100 minutes for both pints and half-pints, adjusting for altitude as needed.
- Depressurize: Turn off the heat and allow the pressure to return to zero naturally; wait an additional 15 minutes before removing the lid.
- Cool down: Let the jars sit in the canner for 5 minutes, then remove them and let them cool at room temperature for 24 hours.
- Finish: Check that the seals are tight, label the jars, and store them in a cool, dry place.
Preparation and Material Guides
Use Freshly Caught Fish
The quality of your canned product depends entirely on the freshness of the raw salmon. Use fish that has been kept on ice or refrigerated and processed within 48 hours of being caught.
Deciding on Skin and Bones
Leaving the skin on helps the fish remain moist and releases healthy oils into the jar during processing. You can also leave the bones in, as they soften and dissolve, providing a source of bio-available calcium.
Cleaning and Prepping Fillets
Thoroughly removing all blood and scales prevents off-flavors in the finished product. Cut the fish into uniform chunks to ensure they fit comfortably in the jars without being squashed.
Sterilizing Your Equipment
Jars must be completely free of debris and sterilized to prevent spoilage. Use boiling water or a dishwasher cycle to ensure all surfaces are clean before adding the fish.
Pressure and Altitude Settings
The Importance of Headspace
Leaving one inch of space at the top of the jar is critical for a proper vacuum seal. This space allows the food to expand during the heating process without pushing liquid out of the jar.
Preventing Lid Buckling
Tightening the metal bands only until fingertip tight allows the lid to move slightly during processing. Overtightening can cause the lid to buckle or fail to seal properly.
Venting the Canner Correctly
Venting for 10 minutes removes all air from the canner, ensuring that the temperature inside is consistent. This step is essential for food safety and ensures the fish reaches the required internal temperature.
Monitoring Pressure Levels
Keep a close eye on your gauge throughout the 100-minute process. If the pressure drops below the required level, you must restart the processing timer from zero.
Dial Gauge Pressure Settings by Elevation
For elevations between 0 and 2,000 feet, use 11 lbs of pressure. Increase this to 12 lbs for 2,001 to 4,000 feet, 13 lbs for 4,001 to 6,000 feet, and 14 lbs for 6,001 to 8,000 feet.
Weighted Gauge Pressure Settings by Elevation
If using a weighted gauge, maintain 10 lbs of pressure for elevations up to 1,000 feet. For any elevation above 1,000 feet, increase the pressure to 15 lbs.
Storage and Quality Control
The Natural Cooling Process
Allowing jars to cool slowly in the canner for 5 minutes and then on the counter for 24 hours prevents thermal shock. This slow cooling helps the lids seal securely.
Checking for Vacuum Seals
After 24 hours, press the center of the lid to ensure it does not spring back. A concave lid indicates a successful vacuum seal and safe preservation.
Managing Shelf-Stable Storage
Store your jars in a cool, dry, and dark environment to prevent oil degradation. Canned salmon is best used within one year for peak quality and flavor.
Understanding Phosphate Crystals
You may see clear crystals called magnesium ammonium phosphate in the jar, which look like glass. These are safe to eat and usually dissolve when the fish is heated.
Serving and Usage Suggestions
Preparing Cold Salmon Salads
Mix canned salmon with mayonnaise, diced celery, lemon juice, and black pepper. Serve this mixture on whole-grain crackers or as a filling for sandwiches.
Integrating Salmon into Hot Soups
Add chunks of canned salmon to a chowder base at the very end of the cooking process. This prevents the fish from breaking apart while heating it through.
Adding Salmon to Breakfast Dishes
Flake the canned salmon into an omelet or scramble it with eggs and fresh chives. It also works well as a topping for avocado toast with a squeeze of lime.
Using Salmon in Pasta Dishes
Toss canned salmon with a cream sauce, garlic, and spinach for a quick meal. The naturally oily texture of the fish complements pasta and parmesan cheese.
Troubleshooting and FAQs
Why Did the Lid Fail?
Lid failure usually occurs due to improper headspace or overtightening the bands. Ensure the rims are completely clean of oils before applying the lids.
Can I Use Water in the Jars?
No water or broth should be added to the jars. Salmon releases enough natural oil and moisture during the pressure canning process to fill the void.
What to Do During Pressure Drops?
If the pressure dips below the target weight or gauge reading, the timer must be reset to zero. The fish must be held at the target pressure for the full 100 minutes.
How Long Does Canned Salmon Last?
While sealed jars can last longer, it is recommended to use home-canned salmon within one year. Store them away from heat sources to maintain the quality of the omega-3 oils.
How Should I Reheat Canned Salmon?
You can reheat the salmon in a pan over medium heat or stir it into a simmering sauce. Avoid overcooking it, as the canning process has already cooked the fish.
Print
Canning Salmon
- Total Time: 120 minutes
- Yield: 16 servings 1x
- Diet: Pescatarian
Description
Canning Salmon is the perfect way to preserve your wild catch; it tastes much better than storebought stuff.
Ingredients
- 4 lbs Fresh salmon
- 1 tsp Salt (optional)
Instructions
- Prep: Start with fresh, cleaned fish. Keep the fish cold until they’re ready to can, not more than two days.
- Clean: Remove the tail, head, scales, fins, and skin, then wash to remove all blood.
- Cut: Cut your salmon filets into smaller pieces that will fit easily into pint jars.
- Heat: Put two to three inches of water in your pressure canner and heat it to simmer.
- Sterilize: Prepare the jars, making sure they’re sterilized and clean.
- Fill: Fill the jars with the salmon, leaving an inch of headspace. You do not need to add any water or broth. If desired, you can add ½ teaspoon of salt per jar.
- Wipe: Wipe the jars with a clean, damp cloth to remove any food particles or fatty deposits.
- Seal: Then, place a hot lid on the jar. Screw the metal band onto the jar until it is fingertip tight. Resist the urge to overtighten, as this can cause the lid to buckle.
- Arrange: Place the filled jars on a rack in the canner, leaving room for steam to flow freely around the jars. In canners that are deep enough to allow you to stack jars, make sure you use a rack between the layers.
- Vent: Put the canner lid on the canner. Heat the canner until you see the steam escaping from the open vent. Once it starts to do this, vent steam for 10 minutes.
- Pressurize: Close the petcock or place the pressure regulator on the vent pipe. Allow the pressure to reach 11 lbs pressure for a dial gauge canner and 10 lbs pressure for a weighted gauge.
- Process: Process the jars at 100 minutes for pints or half pints (adjusting for altitude, see notes).
- Cool: When the canning time is done, turn off the heat and allow the pressure to return to zero. Wait an additional fifteen minutes, then remove the lid. Let the jars cool for another five minutes in the canner, then take them out and allow them to cool at room temperature for 24 hours.
- Store: Check the seals, label, and store.
Notes
The salt in this recipe is optional. Altitude Adjustments: Dial gauge canners (0-2,000 ft: 11 lbs; 2,001-4,000 ft: 12 lbs; 4,001-6,000 ft: 13 lbs; 6,001-8,000 ft: 14 lbs). Weighted gauge canners (0-1,000 ft: 10 lbs; Above 1,000 ft: 15 lbs).
- Prep Time: 10 minutes
- Cook Time: 10 minutes
- Category: Fish
- Method: Pressure Canning
- Cuisine: American
Nutrition
- Serving Size: 1 serving
- Calories: 161 kcal
- Sugar: 0 g
- Sodium: 195 mg
- Fat: 7 g
- Saturated Fat: 1 g
- Unsaturated Fat: 6 g
- Trans Fat: 0 g
- Carbohydrates: 0 g
- Fiber: 0 g
- Protein: 22 g
- Cholesterol: 62 mg