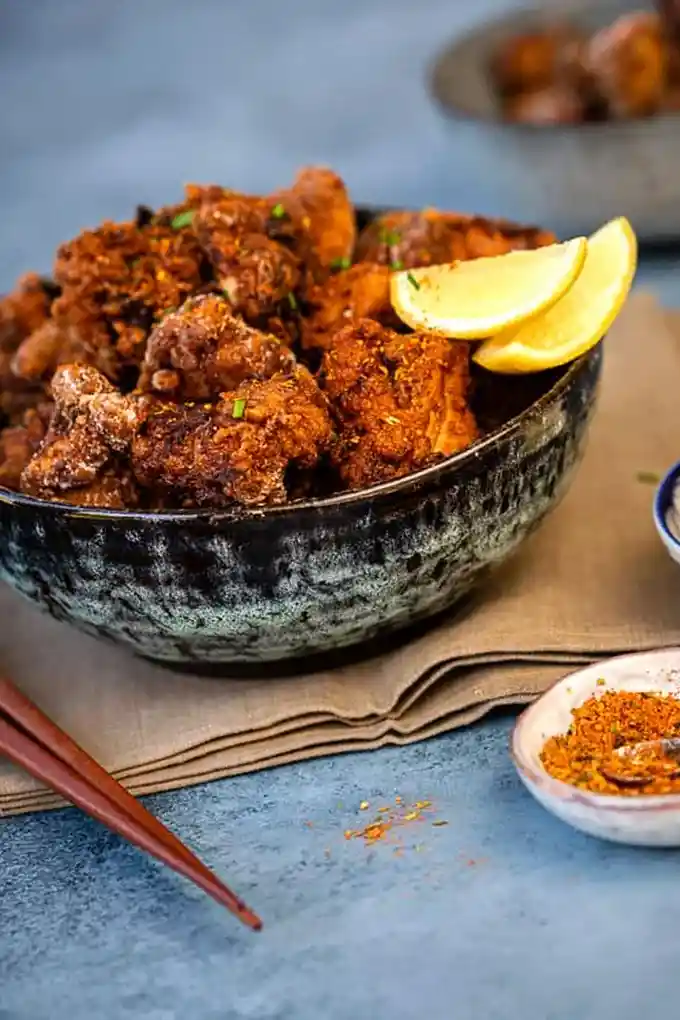
This Japanese-style fried chicken features a light, ultra-crispy coating and a succulent, flavorful interior. It is an ideal appetizer for gatherings or a satisfying main course when served with steamed rice.
List of ingredients
- 2 tbsp dark soy sauce – provides depth and saltiness.
- 2 tbsp honey – adds sweetness and helps with browning (can substitute with 1 tsp sugar).
- 6 garlic cloves, minced – for a pungent, aromatic base.
- 2 tbsp fresh ginger, finely grated – adds a zesty, warm flavor.
- 1 tbsp apple cider vinegar – replaces sake for tang and tenderness.
- 450 g (1 lb) skinless boneless chicken thighs – ensures the meat remains juicy.
- 30 g (1/4 cup) potato starch – creates the signature crispy shell (can use corn starch).
- 30 g (1/4 cup) flour – adds structure to the coating.
- Sunflower oil – used for deep frying due to its high smoke point.
step-by-step instructions
- Prepare the meat: Cut skinless, boneless chicken thighs into even, smallish pieces. Remove any visible excess fat to ensure a clean fry.
- Marinate: Place the chicken pieces in a bowl and mix in the minced garlic, honey, soy sauce, apple cider vinegar, and grated ginger. Cover the bowl and refrigerate for at least one hour, then let it sit at room temperature for 30 minutes before cooking.
- Coat the chicken: Combine the potato starch and flour in a separate bowl. Add the marinated chicken and mix quickly just before frying; an uneven coating is acceptable and helps create an authentic texture.
- First fry: Heat sunflower oil in a pot or fryer to 160-165°C (320-329°F). Fry the chicken in batches for 90 seconds, then remove and set on a wire rack.
- Second fry: Increase the oil temperature to 190°C (375°F). Fry the chicken again for 45 to 60 seconds until the exterior is golden brown and very crispy.
- Drain and check: Transfer the chicken to a plate lined with paper towels to remove excess oil. Use a digital thermometer to ensure the internal temperature has reached 75°C (165°F).
- Serve: Present the chicken immediately with fresh lemon wedges, a sprinkle of Japanese Seven Spice seasoning, and a side of wasabi mayonnaise.
Precision Frying Techniques
Use a Digital Thermometer for Accuracy
Monitoring oil temperature is the most critical factor in achieving the perfect crunch. If the oil is too cool, the chicken absorbs excess grease and becomes soggy. If it is too hot, the outside burns before the inside is safe to eat.
Preventing Oil Temperature Drops
Avoid overcrowding the frying pot by cooking the chicken in small batches. Adding too many pieces at once causes the oil temperature to plummet rapidly. This leads to uneven cooking and a loss of crispiness.
The Science of the Double Fry
The first fry at a lower temperature cooks the meat through and sets the initial structure of the crust. The second fry at a higher temperature flashes off remaining surface moisture and creates a deep golden, shatteringly crisp exterior.
Selecting High Smoke Point Oils
Sunflower oil is recommended because it can withstand high temperatures without breaking down or smoking. Other suitable options include canola or peanut oil. Avoid using extra virgin olive oil as it cannot handle the heat required for Karaage.
Coating and Texture Optimization
The Advantage of Potato Starch
Potato starch is the traditional choice for Karaage because it creates a lighter and crispier shell than wheat flour alone. It results in a distinct, glass-like crunch that stays crisp longer. It is generally available in Asian grocery stores.
Combining Starch with Wheat Flour
Mixing potato starch with plain flour provides a balance of texture and adhesion. The flour helps the coating stick better to the marinated meat, while the starch provides the crunch. This combination prevents the breading from slipping off during the second fry.
Using Cornstarch as a Substitute
If potato starch is unavailable, cornstarch is an excellent alternative. While the texture is slightly different, it still delivers a significantly crispier result than using only flour. Ensure it is mixed well with the flour for the best consistency.
Rice Flour for an Extra Crisp
For those seeking an even harder crunch, rice flour can be substituted for the wheat flour portion. Rice flour is very low in gluten and absorbs less oil. This results in a very clean, dry finish to the fried chicken.
Flavor Enhancements and Substitutions
Replacing Honey with Granulated Sugar
While honey provides a rich sweetness and helps the chicken caramelize, granulated sugar is a practical substitute. Use 1 teaspoon of sugar for every 2 tablespoons of honey. Sugar provides a cleaner sweetness and may lead to a slightly faster browning process.
Using Vinegar Instead of Sake
Apple cider vinegar or white grape juice can replace sake to maintain the acidity needed to tenderize the meat. The acidity breaks down the muscle fibers, making the chicken more tender. It also balances the saltiness of the soy sauce.
Adjusting Ginger and Garlic Ratios
The garlic and ginger provide the aromatic core of the dish. For a more pungent flavor, increase the amount of fresh garlic. For a brighter, more zesty profile, add an extra teaspoon of finely grated ginger.
Enhancing the Marinade Penetration
Allowing the chicken to marinate for several hours or overnight can deepen the flavor profile. However, avoid marinating for more than 24 hours as the acidity can begin to change the texture of the meat. Always bring the meat back to room temperature before frying.
Serving and Pairing Ideas
Creating a Homemade Wasabi Mayo
Mix one teaspoon of wasabi paste into a half cup of high-quality mayonnaise. Stir until the paste is fully incorporated and the spice level is to your liking. This creamy, pungent dip cuts through the richness of the fried chicken.
Using Shichimi Togarashi Seasoning
Sprinkle the finished chicken with Shichimi Togarashi, a Japanese seven-spice blend. This adds a complex layer of heat, citrus, and nuttiness. It complements the savory soy marinade and adds a professional touch to the presentation.
Pairing with Steamed Rice and Greens
To turn this appetizer into a full meal, serve the Karaage over a bowl of short-grain steamed rice. Pair it with steamed bok choy or a simple cucumber salad. The freshness of the vegetables balances the fried nature of the chicken.
Serving Karaage in Bao Buns
Place the crispy chicken pieces inside steamed lotus leaf buns. Add a slice of pickled radish and a drizzle of Japanese mayo. This transforms the recipe into a modern fusion snack that is popular in urban eateries.
Using Chicken as a Burger Filling
Fry larger pieces of chicken thigh to create a patty-like shape for a burger. Place the chicken in a toasted brioche bun with shredded cabbage and a ginger-soy glaze. This makes for a hearty, Japanese-inspired dinner option.
Storage and Reheating Guide
Refrigerating Leftover Chicken
Store any leftover Karaage in an airtight container in the refrigerator for up to three days. Ensure the chicken is completely cooled before sealing the lid to prevent steam from making the coating soggy. Keep the dipping sauces in separate containers.
Reheating in an Air Fryer
The air fryer is the best tool for restoring the original crunch. Heat the air fryer to 180°C (350°F) and cook the chicken for 3 to 5 minutes. This removes the absorbed moisture and crisps the starch coating again.
Using an Oven for Reheating
If you do not have an air fryer, use a conventional oven preheated to 200°C (400°F). Place the chicken on a wire rack over a baking sheet to allow air to circulate. Heat for about 5 to 10 minutes until the exterior is hot and crisp.
Avoiding the Microwave for Fried Foods
Do not use a microwave to reheat Karaage as it traps steam inside the coating. This results in a rubbery texture and a soggy exterior. Microwaving destroys the hard work put into the double-frying process.
Air Fryer Specific Advice
Ensuring a Single Layer for Airflow
When using an air fryer, arrange the chicken in a single layer without overcrowding. Air needs to circulate around each piece to create a crisp exterior. Cook in multiple batches if necessary to avoid steaming the meat.
Applying Cooking Sprays for Color
Since air fryers do not submerge the food in oil, the chicken can look pale. Spray the basket and the chicken generously with a low-calorie cooking spray. This helps the potato starch brown and mimic the look of deep frying.
Adjusting Timing for Larger Pieces
If you cut the chicken into larger chunks for burgers, increase the cooking time. Larger pieces may require 15 to 18 minutes total. Always check the internal temperature to ensure it has reached 75°C (165°F).
Managing the Starch Coating in Air Fryers
Avoid using too much flour or starch when air frying, as it can remain powdery. Use chopsticks to roll the chicken in the coating and shake off any excess. A light, thin coating works best for the air circulation method.
Troubleshooting Common Issues
Preventing the Coating from Falling Off
If the breading separates from the meat, it is often because the chicken was too wet when coated. Ensure the marinade is well-distributed and that you only coat the chicken immediately before frying. Do not let the coated chicken sit for long periods.
Fixing Overly Greasy Chicken
Greasy chicken usually results from frying at too low a temperature. Ensure your oil is strictly between 160°C and 190°C as specified. Using a wire rack for draining instead of a flat plate also prevents the chicken from sitting in its own oil.
Addressing Burnt Exteriors and Raw Interiors
This occurs when the oil is far too hot during the first fry. If the chicken browns too quickly, lower the heat immediately. The double-fry method is designed to prevent this by cooking the interior first at a moderate temperature.
Improving Marinade Penetration
If the meat tastes bland inside, try poking the chicken thighs with a fork before marinating. This creates small channels for the soy and ginger to enter. Ensure the chicken is fully submerged in the marinade during the refrigeration period.
Frequently Asked Questions
Can I use chicken breast instead of thighs?
Yes, you can use breast meat, but it will be significantly drier. Thighs are preferred for Karaage because their higher fat content keeps the meat juicy during the intense heat of double frying.
How long can the chicken marinate?
The minimum marination time is one hour. For the best flavor, 4 to 6 hours is ideal. Avoid exceeding 24 hours, as the vinegar and salt can break down the meat too much, resulting in a mushy texture.
Do I have to double fry the chicken?
While you can fry it once, you will lose the characteristic shatter-crisp texture. Double frying is the secret to Japanese Karaage, as it ensures the meat is cooked through while the skin is perfectly crisp.
Which oil is best for high-heat frying?
Sunflower, canola, and peanut oils are the best choices because they have high smoke points. Avoid butter or unrefined oils, as they will burn and create a bitter taste at the temperatures required for this recipe.
Print
Crispy Japanese Chicken Karaage
- Total Time: 1 hour 45 minutes
- Yield: 3 people 1x
- Diet: General
Description
Chicken Karaage, a.k.a Japanese Fried Chicken, is crispy on the outside and super moist within. Delicious as an appetizer or serve with rice to turn it into meal.
Ingredients
- 2 tbsp dark soy sauce
- 2 tbsp honey
- 6 garlic cloves, minced
- 2 tbsp fresh ginger, finely grated
- 1 tbsp apple juice
- 450 g skinless boneless chicken thighs
- 30 g potato starch
- 30 g flour
- sunflower oil to fry
Instructions
- Step 1: Cut your skinless and boneless chicken thighs into even smallish pieces and remove any visible fat.
- Step 2: Put the chicken into a bowl and add minced garlic, honey, soy sauce, apple juice and grated ginger. Stir to combine, cover and leave to marinate for at least an hour (in the fridge). Bring back to room temperature for 30 minutes prior to cooking.
- Step 3: Combine the potato starch and flour and then add to the chicken. Mix together quickly just before you are ready to fry.
- Step 4: Meanwhile prepare your fryer or heat the oil in a pot. When the oil reaches a temperature of 160C/320F start frying your chicken in batches. Cook for 90 seconds and then set aside on a wire rack.
- Step 5: Increase the oil temperature to 190C/375F and fry the chicken again for 45secs- 1min. The skin should be golden and crispy.
- Step 6: Transfer chicken to a plate lined with paper towels. Check the chicken temperature – it should be 75C /165F.
- Step 7: Serve immediately with lemon wedges, some Japanese Seven Spice seasoning and a side of wasabi mayo.
Notes
Make sure the oil temperature remains consistent when frying. If it is too hot the chicken will colour quickly but be raw inside. Monitor the temperature with a digital thermometer. Serve with wasabi mayo – mix 1tsp wasabi paste into mayonnaise.
- Prep Time: 12 minutes
- Cook Time: 3 minutes
- Category: Appetizer, Main Course
- Method: Deep Frying
- Cuisine: Japanese
Nutrition
- Serving Size: 1 person
- Calories: 322 kcal
- Sugar: 12 g
- Sodium: 807 mg
- Fat: 6 g
- Saturated Fat: 2 g
- Unsaturated Fat: 4 g
- Trans Fat: 0 g
- Carbohydrates: 32 g
- Fiber: 1 g
- Protein: 32 g
- Cholesterol: 143 mg