This pressure cooker teriyaki chicken is a fast way to prepare a sweet and savory meal using a homemade sauce. It is an ideal option for busy weeknights when you need a protein-rich dinner with minimal cleanup.
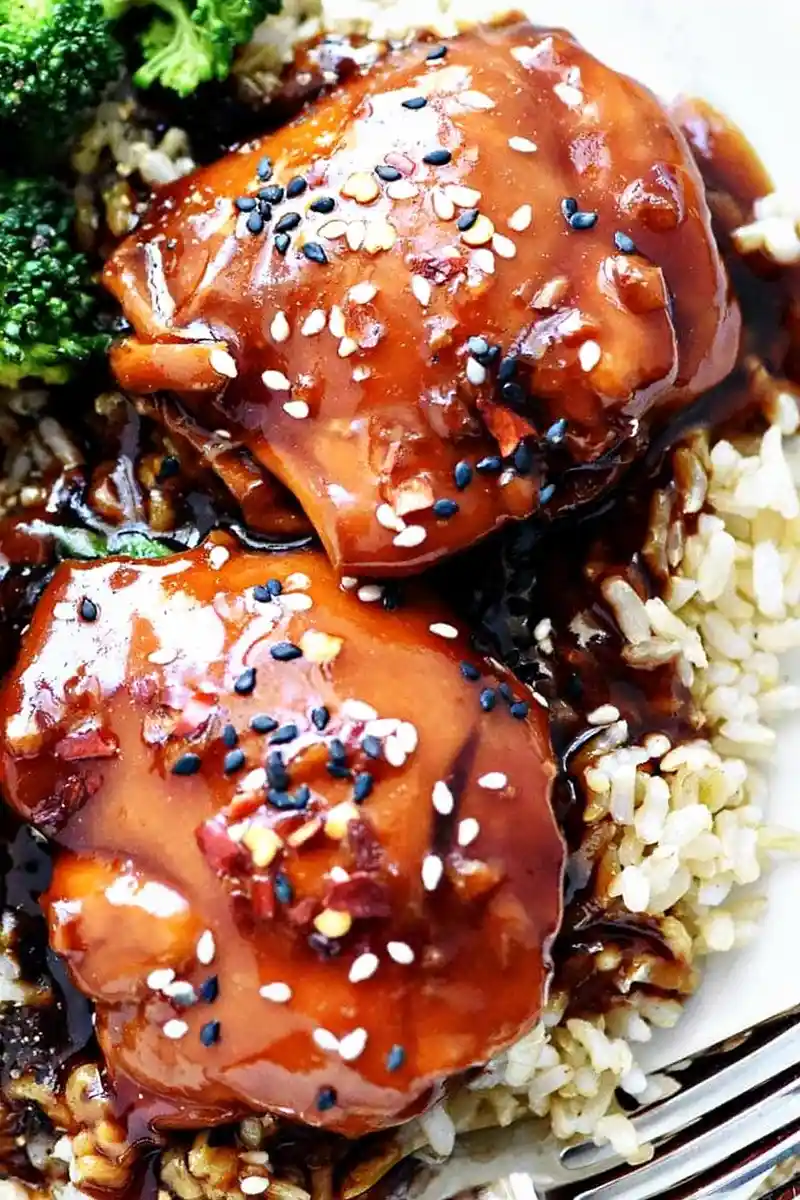
List of ingredients
- 1/2 cup low-sodium soy sauce – provides the salty base for the glaze.
- 1/2 cup honey – adds a natural, sticky sweetness.
- 3 tablespoons rice vinegar – brings a necessary tangy balance to the sugar.
- 2 tablespoons water – thins the sauce slightly for even cooking.
- 4 cloves garlic, minced – adds aromatic depth.
- 2 tablespoons minced fresh ginger – provides a zesty, warm flavor.
- 1/2 teaspoon crushed red pepper flakes (optional) – adds a subtle hint of heat.
- 2 1/2 pounds boneless skinless chicken thighs (about 8 pieces) – keeps the meat juicy under pressure.
- 3 tablespoons cornstarch – used for thickening the final glaze.
- 3 tablespoons cold water – mixed with cornstarch to create a smooth slurry.
step-by-step instructions
- Prepare the sauce: In a medium bowl or large measuring cup, whisk together the soy sauce, honey, rice vinegar, water, garlic, ginger, and red pepper flakes until well combined.
- Arrange the chicken: Place the chicken thighs in the bottom of the pressure cooker insert, pouring a small amount of sauce between the layers and the remaining sauce over the top.
- Pressure cook: Seal the lid of the Instant Pot according to the owner’s manual and cook on HIGH pressure for 10 minutes.
- Release pressure: Once the timer expires, allow the pressure to release naturally for 5 minutes. Carefully vent the remaining pressure manually.
- Thicken the glaze: Remove the cooked chicken thighs to a plate and set the Instant Pot to the SAUTE function. In a small bowl, whisk together the cornstarch and cold water until no lumps remain.
- Simmer the sauce: Once the sauce in the pot begins to bubble, slowly pour in the cornstarch slurry while whisking constantly. Allow it to bubble for one to two minutes, stirring occasionally, until the sauce reaches a thickened consistency.
- Combine and serve: Cancel the SAUTE function and return the chicken thighs to the pot, coating them in the thickened sauce. Serve over rice or shred the chicken for sandwiches.
Cooking Techniques for Better Results
Use Fresh Ginger for Maximum Flavor
Always use fresh ginger root rather than ground powder for this recipe. You can easily peel the ginger by using the edge of a spoon to scrape off the thin skin. For long-term storage, keep leftover ginger in a freezer-safe bag and grate it while frozen.
Sear the Chicken for Extra Texture
If you prefer a browned exterior, use the SAUTE function to brown the thighs in a tablespoon of oil for 1-2 minutes per side before pressure cooking. After searing, it is critical to deglaze the bottom of the pot with a splash of water. Scrape up all the browned bits to prevent the Instant Pot from triggering a burn warning.
Choose the Right Soy Sauce
Low-sodium soy sauce is recommended to keep the salt levels balanced with the honey. For a gluten-free version, substitute the soy sauce with Tamari or coconut aminos. These alternatives provide the same savory umami profile without the wheat content.
Perfect the Cornstarch Slurry
Ensure you use cold water when mixing your cornstarch slurry to avoid premature clumping. Whisk the two together in a small bowl until the mixture is completely smooth before adding it to the boiling sauce. Adding the slurry slowly while whisking the pot contents ensures a glossy, uniform glaze.
Ingredient Substitutions and Variations
Using Chicken Breasts Instead of Thighs
While thighs are more forgiving, you can use boneless, skinless chicken breasts if preferred. Adjust the cooking time to HIGH pressure for 10 minutes, but increase the natural pressure release to 10 minutes. This prevents the leaner meat from becoming tough or rubbery.
Cooking with Frozen Chicken Thighs
You can cook chicken thighs directly from frozen in the pressure cooker. Increase the cooking time to 13 minutes on HIGH pressure and allow for a 10-minute natural pressure release. Always use a meat thermometer to ensure the internal temperature reaches 165°F.
Substituting Honey for Other Sweeteners
If you do not have honey, maple syrup is an excellent substitute that adds a slightly different depth of flavor. Brown rice syrup or agave nectar also work well to provide the necessary viscosity and sweetness. Adjust the amount slightly based on the potency of the sweetener used.
Alternative Thickening Agents
For those avoiding cornstarch, arrowroot powder or tapioca starch can be used in the same 1:1 ratio. These alternatives often produce a clearer, more translucent glaze. Mix them with cold water just as you would with cornstarch to ensure a smooth consistency.
Serving and Pairing Ideas
Traditional Grain Pairings
Serve the teriyaki chicken over steamed brown rice or white jasmine rice for a classic meal. Quinoa is another healthy alternative that absorbs the sauce well. For a more traditional Asian experience, use thin rice noodles tossed with a bit of sesame oil.
Low-Carb Vegetable Bases
To reduce carbohydrates, serve the chicken over cauliflower rice or spiralized zucchini noodles. Summer squash noodles also provide a great texture that complements the sticky sauce. Steamed bok choy or sautéed spinach can serve as a nutrient-dense base.
Creative Sandwich Applications
Shred the cooked chicken thighs directly into the sauce to create a filling for sandwiches. Pile the mixture onto hoagie buns, toasted slider rolls, or crusty French bread. Adding a layer of crisp cabbage slaw on top provides a refreshing contrast to the rich glaze.
Building Teriyaki Bowls
Create a customizable bowl by starting with a base of chopped romaine, kale, or shredded Napa cabbage. Add the teriyaki chicken and supplement with shredded carrots, edamame, and sliced green onions. A side of sesame ginger vinaigrette can be drizzled over the vegetables for extra zing.
Storage and Reheating Advice
Refrigeration Guidelines
Store leftover chicken and sauce in an airtight glass or plastic container in the refrigerator. The dish will stay fresh and safe to eat for 3 to 4 days. Keep the chicken submerged in the sauce to prevent the meat from drying out during storage.
Freezing for Future Meals
This recipe freezes well if stored in freezer-safe containers or vacuum-sealed bags. Label the containers with the date and use them within three months for the best quality. Thaw the chicken in the refrigerator overnight before reheating to ensure even warming.
Best Reheating Methods
To reheat on the stovetop, place the chicken and sauce in a pan over medium-low heat. Add a tablespoon of water or chicken broth to loosen the sauce as it warms. If using a microwave, cover the dish to trap steam and heat in short intervals, stirring in between.
Troubleshooting and FAQs
Why is my sauce too thin?
If the sauce is not thick enough, it may be because the cornstarch slurry was not cooked long enough. Return the sauce to the SAUTE function and let it bubble for another minute or two. If it remains thin, whisk in an additional teaspoon of cornstarch mixed with a teaspoon of cold water.
How do I avoid the ‘Burn’ warning?
The burn warning usually happens when food or sugars are scorched on the bottom of the inner pot. Ensure you deglaze the pot thoroughly after searing the meat. Adding enough liquid (like the water and soy sauce in the recipe) helps create the steam necessary for pressure cooking.
Can I use ground ginger instead of fresh?
Ground ginger is much more concentrated and has a different flavor profile than fresh ginger. While it can be used in a pinch, it lacks the bright, zesty punch of the fresh root. Use about 1/4 teaspoon of ground ginger for every tablespoon of fresh ginger required.
What size Instant Pot is best for this recipe?
A 6-quart Instant Pot is the ideal size for this quantity of chicken and sauce. If using a smaller 3-quart model, you may need to reduce the chicken quantity to avoid overfilling. For an 8-quart model, the recipe works as written with plenty of extra room.
How do I know when the chicken is fully cooked?
The most reliable method is using an instant-read meat thermometer. Insert the probe into the thickest part of the largest chicken thigh. The chicken is safe to eat once it reaches an internal temperature of 165°F.
Can I add vegetables to the pressure cooker?
You can add hearty vegetables like carrots or broccoli stems to the pot during the pressure cooking stage. However, softer vegetables like snap peas or sliced bell peppers should be stirred in at the end. Sauté them briefly in the sauce after the chicken is removed to keep them crisp.
Print
Easy Instant Pot Teriyaki Chicken
- Total Time: 40 minutes
- Yield: 4 to 6 servings 1x
- Diet: General
Description
Instant Pot Teriyaki Chicken is a quick, easy pressure cooker recipe featuring chicken thighs in a sticky-sweet homemade sauce. Serve this teriyaki chicken recipe over rice or quinoa or shred it as a sandwich filling!
Ingredients
- 1/2 cup low-sodium soy sauce
- 1/2 cup honey
- 3 tablespoons rice vinegar
- 2 tablespoons water
- 4 cloves garlic, minced
- 2 tablespoons minced fresh ginger
- 1/2 teaspoon crushed red pepper flakes (optional)
- 2 1/2 pounds boneless skinless chicken thighs
- 3 tablespoons cornstarch
- 3 tablespoons cold water
Instructions
- Step: In a medium bowl or large measuring cup, whisk together the soy sauce, honey, rice vinegar, water, garlic, ginger, and red pepper flakes. Place the chicken thighs in the bottom of the pressure cooker insert, pouring a little bit of sauce between the layers and the rest over the top.
- Step: Seal the lid of the Instant Pot according to the owner’s manual and cook on HIGH pressure for 10 minutes.
- Step: When the timer is done, allow the pressure to release naturally for 5 minutes, then carefully vent to release the remaining pressure.
- Step: Open the lid, remove the chicken thighs to a plate, and set the Instant Pot to SAUTE. In a small bowl, whisk together the cornstarch and water until completely dissolved. Once the sauce starts bubbling, slowly pour in the cornstarch slurry while whisking the sauce. Allow to bubble and cook for a minute or two, stirring occasionally, until the sauce is thickened. Cancel the SAUTE function and add the chicken back to the sauce. Serve the sauce with the chicken thighs over rice, or shred the chicken thighs into the sauce and serve on buns.
Notes
For frozen thighs, cook on HIGH for 13 minutes and allow the pressure to release for 10 minutes. You may use chicken breasts instead: cook on HIGH for 10 minutes and release pressure for 10 minutes. If using bone-in, skin-on chicken thighs, brown them first using the SAUTE function for 1-2 minutes per side and deglaze the pot before adding sauce.
- Prep Time: 10 minutes
- Cook Time: 10 minutes
- Category: Main Course
- Method: Pressure Cooking
- Cuisine: Asian
Nutrition
- Serving Size: 1 serving
- Calories: 345 kcal
- Sugar: 23 g
- Sodium: 939 mg
- Fat: 8 g
- Saturated Fat: 2 g
- Unsaturated Fat: 5 g
- Trans Fat: 0.03 g
- Carbohydrates: 29 g
- Fiber: 0.4 g
- Protein: 39 g
- Cholesterol: 180 mg