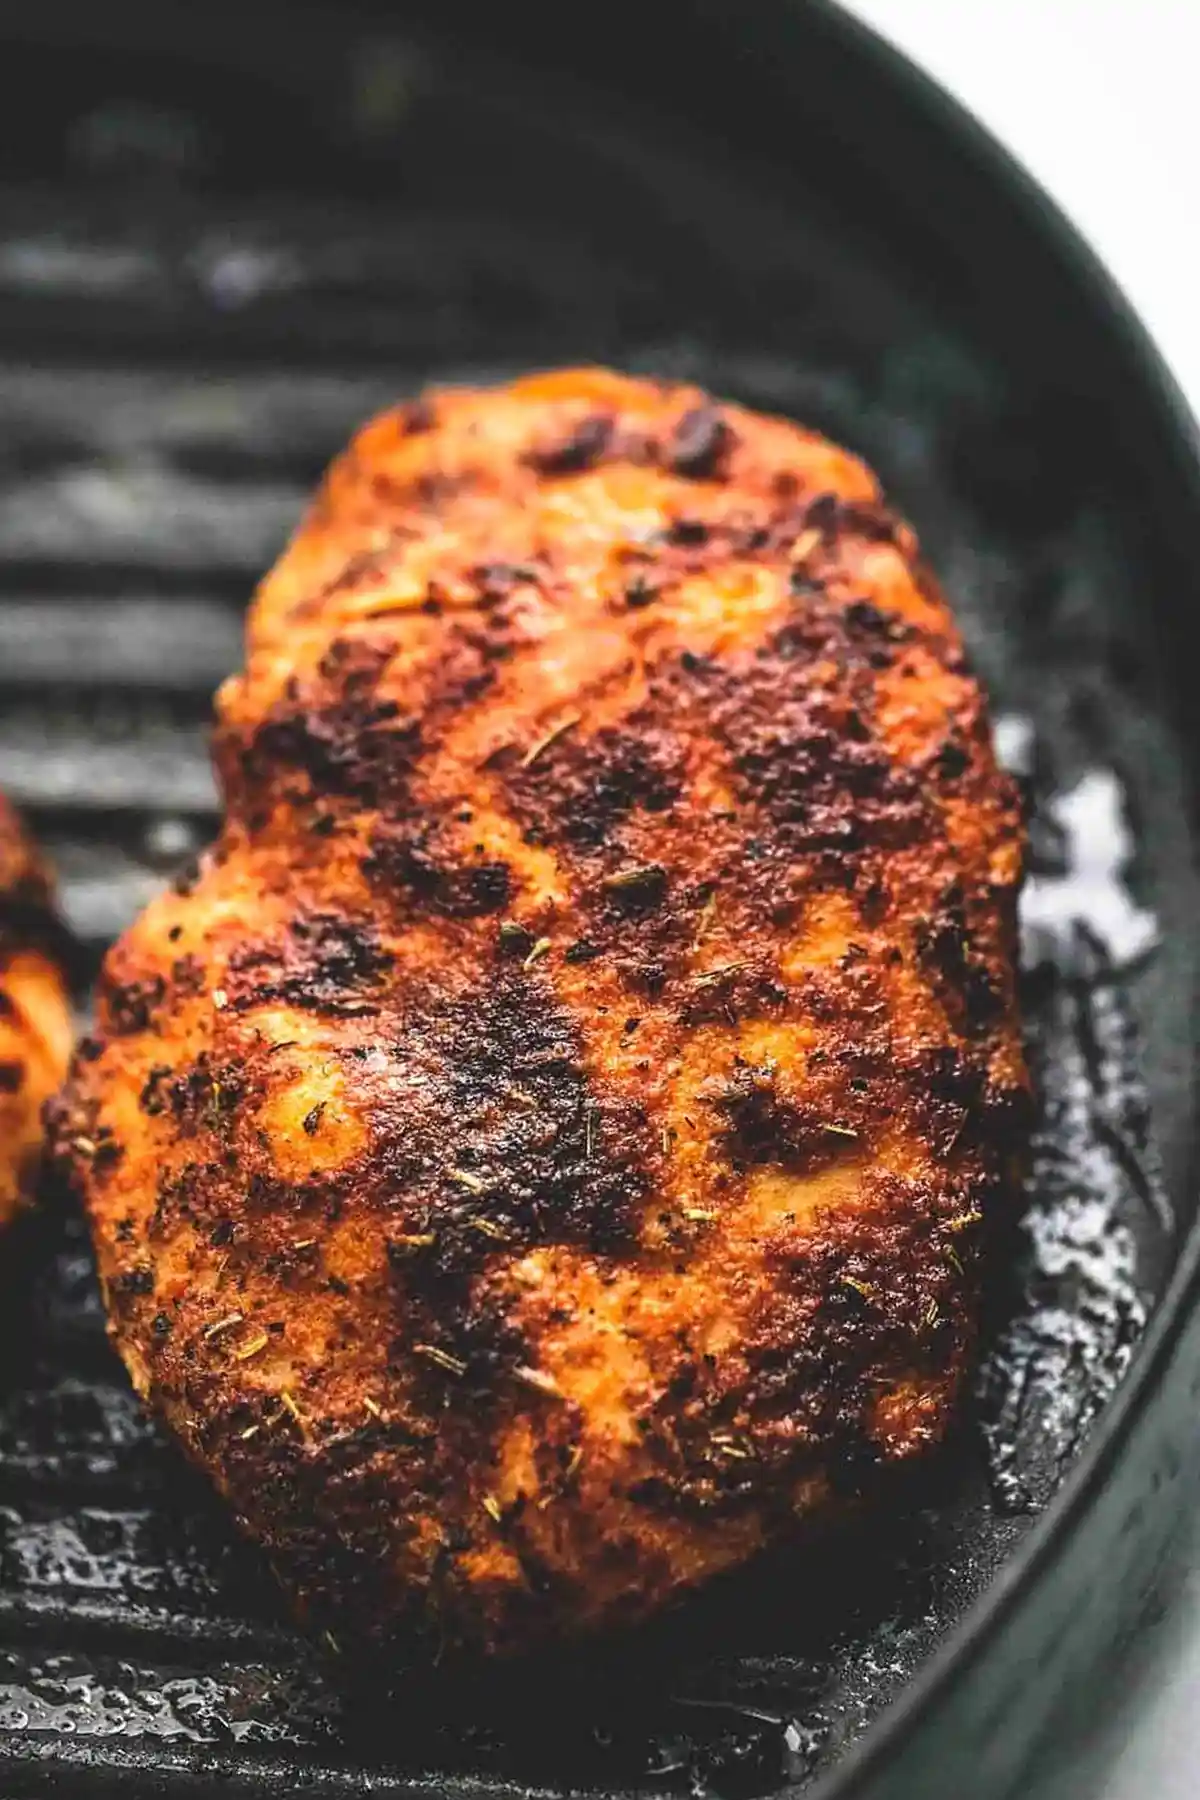
Create a versatile spice blend to keep in your pantry for fast meal preparation. This rub adds deep flavor to grilled chicken without the need for long marinating times.
List of ingredients
- 1 tablespoon salt – enhances all other flavors in the blend.
- 3 teaspoons dried Italian herb blend or Herbs de Provence – adds aromatic floral notes.
- 2 teaspoons garlic powder – provides a savory and pungent base.
- 2 teaspoons smoked paprika – gives a woody and smoky depth.
- 1 teaspoon dry ground mustard – adds a subtle sharp tang.
- 1 teaspoon brown sugar – helps with caramelization and sweetness.
- ½ teaspoon onion powder – complements the garlic for extra depth.
- ½ teaspoon black pepper – provides a mild and earthy heat.
- ½ teaspoon cayenne pepper – adds a spicy kick to the finish.
step-by-step instructions
- Mix the Seasoning: Whisk together all ingredients in a bowl until evenly combined. Store the mixture in an airtight container at room temperature.
- Prepare the Chicken: Drizzle olive oil over the surface of the chicken pieces. This acts as a binder for the rub.
- Apply the Rub: Rub the spice blend generously over the meat. Ensure full coverage on all sides of the chicken.
- Grill and Serve: Cook the chicken on the grill until it is completely cooked through. Serve immediately, or slice and dice for use in other recipes.
Professional Application Techniques
Applying Rub to Skin-On Chicken
For chicken with skin, lift the skin carefully and apply the rub directly to the meat underneath. This ensures the spices penetrate the meat rather than burning on the surface of the skin. Press the skin back down to seal in the flavor.
Using Olive Oil as a Binder
Apply a light coating of olive oil before adding the dry rub to create a sticky surface. This prevents the spices from falling off during the flipping process. It also helps conduct heat more evenly across the surface of the meat.
The Ideal Application Timing
Apply the rub and grill the meat immediately for the freshest flavor profile. While you can let it sit for up to four hours, extended time can cause the salt to draw out moisture. This may lead to a less effective sear on the grill.
Preparing the Chicken Surface
Pat the chicken dry with paper towels before applying oil and spices. Removing excess surface moisture allows the oil to adhere better and prevents the meat from steaming. This results in a better crust and more intense flavor.
Achieving an Even Coating
Use your hands to press the spices firmly into the meat rather than just sprinkling them. Ensure that every crevice and fold of the chicken is covered. An even coat prevents bland spots and ensures consistent seasoning in every bite.
Scaling the Batch for Large Groups
This recipe is easily doubled or tripled if you are cooking for a crowd. Mix the large batch in a wide bowl to ensure the smaller ingredients, like cayenne, are distributed evenly. Store any leftovers in a sealed jar.
Managing Rub Adhesion
If the rub feels too dry and will not stick, add a small amount of additional olive oil to the meat. Avoid adding liquid directly to the spice mix, as this will cause clumping. Keep the rub dry for long-term storage.
Avoiding Over-Seasoning
Since the rub contains a full tablespoon of salt, avoid adding extra salt to the meat before application. The concentration of salt is balanced for about 12 large chicken breasts. Adjust the quantity of rub used based on the size of your chicken cuts.
Customizing Your Flavor Profile
Adjusting the Heat Level
For a milder flavor suitable for children, omit the cayenne pepper entirely. To increase the heat, double the amount of cayenne or add a pinch of red pepper flakes. Always test the heat level with a small sample before seasoning the entire batch.
Managing Sugar Caramelization
The brown sugar in the rub creates a delicious glaze but can burn at very high temperatures. Keep the grill at a medium-high heat to avoid scorching the sugar. If the exterior darkens too quickly, move the chicken to a cooler part of the grill.
Substituting Italian Herbs
If an Italian blend is unavailable, create your own using equal parts dried oregano, basil, and thyme. Herbs de Provence is another excellent alternative that adds a slightly more floral note. Ensure the herbs are finely ground for better adhesion.
Alternative Sweeteners
Maple sugar can be substituted for brown sugar to add a distinct autumnal sweetness. Coconut sugar is a suitable plant-based alternative that provides a similar caramelization effect. Use the same one-teaspoon measurement to maintain the flavor balance.
Using Salt Alternatives
Kosher salt can be used instead of table salt, but you may need to increase the volume slightly as the grains are larger. Pink Himalayan salt is another viable option for a subtle mineral taste. Ensure the salt is finely granulated for an even mix.
The Role of Ground Mustard
Do not omit the dry ground mustard as it provides a sharp contrast to the sweet brown sugar. It cuts through the richness of the chicken fat and enhances the other savory spices. It provides a professional depth often found in restaurant rubs.
Adding Citrus Notes
While not part of the dry rub, a squeeze of fresh lemon or lime juice after grilling complements these spices perfectly. The acidity brightens the smoked paprika and garlic notes. This adds a fresh contrast to the deep, toasted flavors of the rub.
Enhancing the Smoky Element
For a more intense smoky flavor, you can increase the amount of smoked paprika. Alternatively, use a small amount of chipotle powder to add both smoke and a different type of heat. Keep the total paprika volume consistent to avoid overpowering the herbs.
Grilling Mastery and Meat Science
Choosing the Right Grill Temperature
Maintain a medium-high heat, approximately 375 to 400 degrees Fahrenheit. This temperature is high enough to sear the meat and caramelize the sugars without burning the herbs. Use a grill thermometer for the most accurate results.
Direct vs Indirect Grilling
Use direct heat for thin cuts like sliced breasts to get a quick sear. For thick chicken breasts or whole thighs, start with a sear and then move the meat to an indirect heat zone. This prevents the outside from burning before the inside is cooked.
The Importance of Internal Temperature
Use an instant-read thermometer to ensure the chicken reaches an internal temperature of 165 degrees Fahrenheit. This is the safety standard for poultry to ensure all pathogens are destroyed. Pull the meat off the grill at 160 degrees as carry-over cooking will finish the process.
The Importance of Meat Resting
Allow the grilled chicken to rest for five to ten minutes before slicing. This allows the juices to redistribute throughout the muscle fibers, ensuring the meat stays moist. Cutting too early allows the juices to escape, resulting in drier meat.
Grilling Chicken Thighs
Chicken thighs have a higher fat content and can withstand higher heat than breasts. They are more forgiving and stay juicy even if slightly overcooked. Grill thighs until the skin is crisp and the meat is fully cooked.
Grilling Chicken Breasts
Chicken breasts lean out quickly and can become dry if overcooked. Consider pounding them to an even thickness before rubbing to ensure they cook uniformly. This reduces the time they spend on the heat.
Handling Chicken Wings
For wings, apply the rub liberally and grill over medium heat, turning frequently. The higher surface-area-to-volume ratio means the rub provides a very concentrated flavor. Avoid extremely high heat to prevent the small amount of sugar from burning.
Preventing Grill Flare-ups
Olive oil can cause flare-ups when it drips onto the coals or burners. Keep a spray bottle of water or a lid handy to manage flames. Moving the meat to a different area of the grill can also stop persistent flare-ups.
Storage and Preservation
Using Airtight Containers
Store the rub in a glass jar with a tight-sealing lid to prevent moisture from entering. Moisture can cause the sugar and salt to clump, making the rub harder to apply. Keep the container in a cool, dry pantry away from the stove.
Checking Spice Potency
To check if your rub is still potent, crush a small amount between your fingers and smell it. If the aroma is faint or non-existent, the volatile oils in the herbs have evaporated. It is best to replace the rub every two to three years.
Opaque Storage Solutions
Store your spice blend in an opaque container or a dark cupboard to protect it from light. UV rays can degrade the color and flavor of the paprika and herbs over time. This preserves the vibrancy of the seasoning.
Avoiding Cross-Contamination
Always use a clean spoon to scoop the rub out of the container. Never use a spoon that has touched raw meat to dip into your stored spice blend. This prevents bacterial growth and extends the shelf life of the rub.
Reheating Grilled Chicken
To reheat leftover grilled chicken, use a low-heat oven or a pan with a splash of water. Avoid the microwave if possible, as it can make the meat rubbery and dry. Warming slowly preserves the integrity of the spice crust.
Storing Cooked Chicken
Place cooked chicken in an airtight container and refrigerate within two hours of cooking. It will stay fresh for three to four days. Store it with any remaining juices to keep the meat moist during storage.
Using Rubs for Meal Prep
Prepare several portions of chicken on a Sunday using this rub and grill them all at once. These can be sliced and added to salads, wraps, or grain bowls throughout the week. The flavors often deepen after a day in the refrigerator.
Freezing Rubbed Chicken
You can apply the rub to raw chicken, vacuum seal it, and freeze it. The rub acts as a dry brine, seasoning the meat as it freezes and thaws. Thaw completely in the refrigerator before grilling.
Frequently Asked Questions
What is the difference between a dry rub and a marinade?
A dry rub consists of dried spices rubbed onto the surface to create a flavorful crust. A marinade uses liquid ingredients like oil or vinegar to tenderize the meat and infuse flavor deep into the fibers.
Can I use a dry rub as a marinade?
No, they serve different purposes. A dry rub provides a seared exterior and concentrated surface flavor, while a marinade is designed to break down proteins and add moisture.
How long does the rub last in the pantry?
If stored in an airtight container in a cool, dark place, the rub lasts for two to three years. The shelf life depends on the freshness of the individual spices used at the time of mixing.
Print
Easy Grilled Chicken Seasoning Rub
- Total Time: 5 minutes
- Yield: 12 servings 1x
- Diet: General
Description
This Grilled Chicken Dry Rub is a flavorful blend of spices you can keep at the ready for when you need a quick chicken recipe for any grilling occasion.
Ingredients
- 1 tablespoon salt
- 3 teaspoons dried Italian herb blend (or Herbs de Provence)
- 2 teaspoons garlic powder
- 2 teaspoons smoked paprika
- 1 teaspoon dry ground mustard
- 1 teaspoon brown sugar
- ½ teaspoon onion powder
- ½ teaspoon black pepper
- ½ teaspoon cayenne pepper
Instructions
- Step 1: Whisk together all ingredients and store in an airtight container at room temperature.
- Step 2: To use, rub all over chicken that has been drizzled with olive oil. Grill chicken until cooked through and serve, or slice or dice and use for other recipes or store chilled in an airtight container to use later.
Notes
Makes enough for about 12 large chicken breasts.
- Prep Time: 5 minutes
- Cook Time: 0 minutes
- Category: Main Course
- Method: Mixing
- Cuisine: American
Nutrition
- Serving Size: 1 serving
- Calories: 5 kcal
- Sugar: 1 g
- Sodium: 582 mg
- Fat: 1 g
- Saturated Fat: 1 g
- Unsaturated Fat: 0 g
- Trans Fat: 0 g
- Carbohydrates: 1 g
- Fiber: 1 g
- Protein: 1 g
- Cholesterol: 0 mg