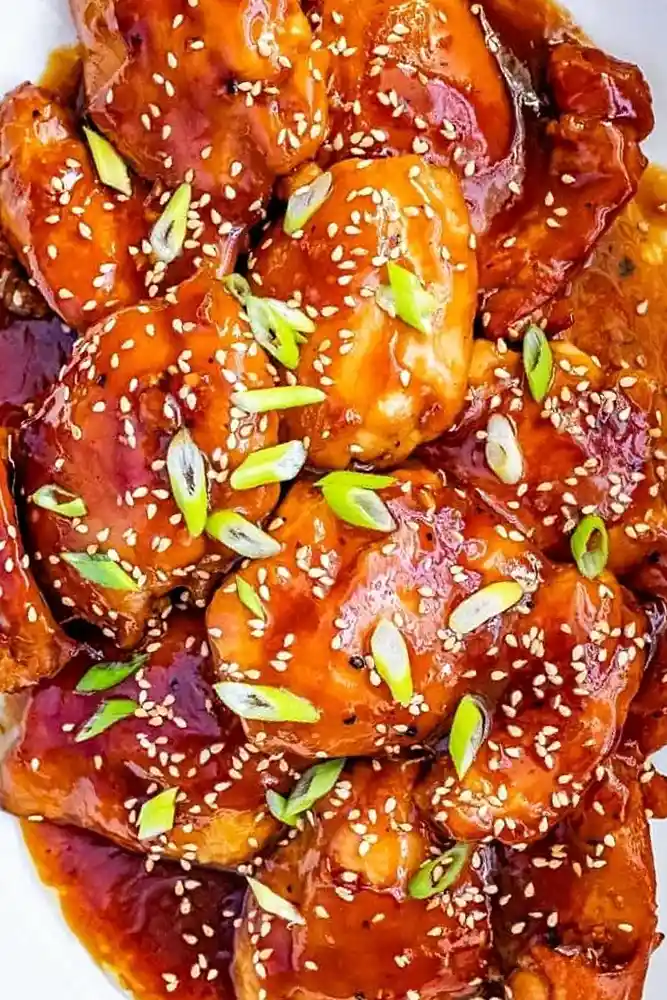
This recipe provides a simple way to create a rich, glossy glaze using a homemade teriyaki sauce. By baking boneless chicken thighs, you ensure the meat remains juicy while the sugar in the sauce caramelizes in the oven.
List of ingredients
- 1 tablespoon cornstarch – used to thicken the glaze.
- 1 tablespoon cold water – prevents cornstarch from clumping.
- 1/2 cup white sugar – provides the classic teriyaki sweetness.
- 1/2 cup soy sauce – adds saltiness and deep color.
- 1/4 cup cider vinegar – balances the sugar with acidity.
- 1 garlic clove, minced – adds aromatic depth.
- 1/2 teaspoon ground ginger – provides a warm, spicy undertone.
- 1/4 teaspoon ground pepper – adds a subtle hint of heat.
- 12 skinless, boneless chicken thighs – the primary protein source.
step-by-step instructions
- Preheat: Set your oven to 350F to ensure it is fully heated before the chicken goes in.
- Prepare Slurry: Dissolve the cornstarch in cold water in a small bowl until smooth.
- Simmer Sauce: Combine the cornstarch slurry with the sugar, soy sauce, cider vinegar, minced garlic, ground ginger, and ground pepper in a small saucepan. Cook over low heat, stirring occasionally, until the mixture is thick and bubbly.
- Prepare Chicken: Place the 12 chicken thighs in a 9 x 13-inch baking dish. Brush the prepared sauce onto both sides of each thigh.
- Bake and Baste: Bake for one hour. Baste the chicken with the remaining sauce every 10 minutes and flip the thighs over at the 30-minute mark.
Sauce Preparation Techniques
Creating a Smooth Cornstarch Slurry
Always mix cornstarch with cold water before adding it to the saucepan. This prevents the starch from forming lumps when it hits the heat. A smooth slurry ensures your final glaze is velvety and consistent.
Managing Heat During Reduction
Keep the saucepan on low heat while simmering the teriyaki sauce. High heat can cause the sugar to burn or the sauce to splatter. Slow simmering allows the flavors to meld and the cornstarch to activate properly.
Achieving the Right Consistency
The sauce is ready when it is thick enough to coat the back of a spoon. If the sauce seems too thin, let it simmer for another few minutes. If it is too thick, stir in a teaspoon of water to loosen it.
Optimizing Chicken Preparation
Choosing the Right Cut
Boneless, skinless chicken thighs are preferred over breasts for this method. Thighs have a higher fat content, which prevents them from drying out during the hour-long baking process. They remain tender and juicy even with repeated basting.
Preparing the Meat Surface
Pat the chicken thighs dry with paper towels before applying the sauce. Removing surface moisture allows the glaze to adhere better to the meat. This results in a thicker, more concentrated layer of flavor.
Uniform Sizing for Even Cooking
Try to use chicken thighs that are similar in size and thickness. If some pieces are significantly larger, they may take longer to cook. Consistent sizing ensures that all pieces reach the safe internal temperature at the same time.
Advanced Baking Strategies
The Importance of Frequent Basting
Basting every 10 minutes builds up multiple layers of glaze on the chicken. As the water evaporates, the sugars concentrate and create a sticky, caramelized exterior. This process is what gives the dish its characteristic professional sheen.
Rotating and Flipping the Meat
Flipping the chicken at the 30-minute mark ensures both sides are exposed to the direct heat of the pan. This prevents the bottom from becoming soggy while the top browns. Rotating the baking dish in the oven can also help if your oven has hot spots.
Monitoring Internal Temperature
While the recipe calls for one hour, use a meat thermometer to verify doneness. Chicken thighs are safe and juicy when they reach an internal temperature of 165F. Overcooking can lead to a stringy texture, even with thigh meat.
Ingredient Substitutions
Using Low-Sodium Soy Sauce
If you prefer a less salty dish, replace the standard soy sauce with a low-sodium version. You may need to add a pinch of extra salt if the flavor feels flat. This is a great way to control the salt intake without losing the umami profile.
Replacing White Sugar with Honey
Honey can be used as a substitute for white sugar to create a richer, floral sweetness. Honey also adds more natural viscosity to the sauce, which may reduce the amount of cornstarch needed. Use a 1:1 ratio by volume.
Switching to Rice Vinegar
Rice vinegar is a milder alternative to cider vinegar and is more traditional for teriyaki. It provides a softer acidity that blends well with the ginger and soy. Use the same quantity as specified for cider vinegar.
Flavor Variations
Adding Spicy Elements
To add heat, stir in a teaspoon of sriracha or red pepper flakes to the sauce. The spice cuts through the sweetness of the sugar and soy. This variation works especially well when served with a cooling side of steamed cabbage.
Enhancing the Garlic Profile
For a deeper garlic flavor, use roasted garlic cloves instead of raw minced garlic. Mash the roasted cloves into a paste before whisking them into the sauce. This removes the sharp bite and adds a nutty, sweet depth.
Incorporating Fresh Ginger
While ground ginger is convenient, freshly grated ginger provides a brighter, more pungent flavor. Use one teaspoon of freshly grated ginger to replace the ground version. Fresh ginger contains oils that add a fresh zest to the final dish.
Complementary Side Dish Ideas
Steamed Jasmine Rice
Jasmine rice is the ideal pairing because its fragrant, slightly sticky texture absorbs the extra teriyaki sauce. Rinse the rice thoroughly before cooking to remove excess starch. Cook it in a rice cooker or on the stovetop for a fluffy result.
Sautéed Bok Choy
Bok choy adds a crisp, refreshing contrast to the rich chicken. Quickly sauté the greens with a bit of oil and a splash of soy sauce over high heat. This keeps the stems crunchy and the leaves tender.
Roasted Root Vegetables
Carrots and parsnips roasted with a touch of honey and salt complement the flavors of the chicken. Toss the vegetables in oil and roast them on a separate sheet pan at 350F. They provide a hearty, earthy balance to the meal.
Storage and Reheating
Refrigeration Guidelines
Store leftover chicken in an airtight container in the refrigerator for up to four days. Keep the extra sauce in a separate small jar to prevent the chicken from becoming too soft. Ensure the meat is cooled slightly before sealing the container.
Freezing for Long-Term Storage
Cooked teriyaki chicken can be frozen for up to three months. Place the chicken in a freezer-safe bag, squeezing out as much air as possible. Thaw the meat in the refrigerator overnight before reheating to maintain the texture.
Optimal Reheating Methods
The best way to reheat the chicken is in the oven at 300F until warmed through. If using a microwave, add a tablespoon of water to the dish and cover it with a lid. This creates steam that prevents the meat from drying out.
Make-Ahead Advice
Pre-Cooking the Sauce
The teriyaki sauce can be made several days in advance and stored in the fridge. When you are ready to cook, simply stir the sauce to re-incorporate any settled ingredients. Gently warm it on the stove before brushing it onto the chicken.
Marinating the Meat
For deeper flavor, you can marinate the thighs in half of the sauce for 4 to 24 hours before baking. Place the chicken and sauce in a sealed bag in the refrigerator. This allows the salt and acid to penetrate the meat, tenderizing it further.
Organizing Your Workspace
Prepare all your minced garlic and measured spices before starting the sauce. Having your mise en place ready prevents the sauce from over-reducing while you look for ingredients. It makes the transition from the stovetop to the oven seamless.
Troubleshooting Common Issues
Fixing a Thin Sauce
If your sauce is too runny after simmering, mix another teaspoon of cornstarch with cold water. Stir this new slurry into the simmering sauce and cook for another minute. The heat will activate the starch and thicken the glaze quickly.
Preventing Burnt Glaze
Because of the high sugar content, teriyaki sauce can burn if the oven is too hot. If you notice the edges of the chicken darkening too quickly, lower the oven temperature by 25 degrees. You can also cover the dish loosely with foil.
Avoiding Dry Chicken Thighs
If the chicken feels dry, you may have overcooked it or used a pan that was too small, causing the sauce to evaporate too quickly. Always use a meat thermometer to pull the chicken at 165F. Adding a small amount of chicken broth to the pan can also add moisture.
Frequently Asked Questions
Can I use chicken breasts instead of thighs?
Yes, but you must reduce the baking time significantly. Chicken breasts cook faster and dry out more easily than thighs. Check for doneness at 30-40 minutes to avoid overcooking.
How do I make the sauce thicker for dipping?
To make a dipping consistency, simmer the sauce for an additional 5-10 minutes after the chicken is done. Reducing the liquid further concentrates the sugars and thickens the glaze.
Can I bake this in a convection oven?
Yes, but reduce the oven temperature to 325F. Convection ovens circulate air more efficiently, which can cause the sugar in the glaze to burn more quickly on the surface.
Is this recipe suitable for meal prep?
Absolutely. This dish holds up well when sliced and paired with rice and steamed vegetables in containers. It tastes great both cold and reheated, making it a practical choice for weekday lunches.
Print
Baked Teriyaki Chicken Thighs
- Total Time: 75 minutes
- Yield: 6 servings 1x
- Diet: General
Description
Stop buying teriyaki sauce and start making your own!
Ingredients
- 1 tablespoon cornstarch
- 1 tablespoon cold water
- ½ cup white sugar
- ½ cup soy sauce
- ¼ cup cider vinegar
- 1 garlic clove, minced
- ½ teaspoon ground ginger
- ¼ teaspoon ground pepper
- 12 skinless, boneless chicken thighs
Instructions
- Step: Preheat the oven to 350F. Dissolve the cornstarch in cold water and combine it with all the other ingredients, except chicken thighs, in a small saucepan. Cook over low heat until the sauce is thick and bubbly.
- Step: Place the chicken thighs in a 9 x 13-inch baking dish and brush them with sauce on both sides
- Step: Bake for one hour, basting with the sauce every 10 minutes, and flipping them once at the 30 min mark.
Notes
Serve with white rice and veggie side dishes like broccoli salad or roasted potatoes. Sprinkle the chicken with toasted sesame seeds and chopped green onions for a finishing touch.
- Prep Time: 15 minutes
- Cook Time: 60 minutes
- Category: Dinner, Main Course
- Method: Baking
- Cuisine: American
Nutrition
- Serving Size: 2 chicken thighs
- Calories: 412 kcal
- Sugar: 16 g
- Sodium: 1166 mg
- Fat: 18 g
- Saturated Fat: 4 g
- Unsaturated Fat: 14 g
- Trans Fat: 0 g
- Carbohydrates: 19 g
- Fiber: 1 g
- Protein: 43 g
- Cholesterol: 80 mg